AccuPlan™ Workflow
AccuPlan™ workflow is simple and integrated with AccuMark & AccuNest.
By the end of this lesson, the user will be able to:
-
Create Settings and Utilization Tables
-
Create a Work Cut Order
-
Run Calculate Markers Cut plan solution
-
Create and process AccuMark Orders and markers from within AccuPlan™
Basic Workflow
Data required for Project 1
IMPORTANT NOTE
During the training class, the corresponding data to work on this project is provided. If not, use the information below as a reference and your AccuMark data.
-
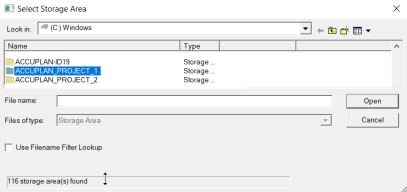
AccuMark Data: Storage Area ACCUPLAN™_PROJECT_1.zip
Import all data in this zip. There are markers already made that will need to be imported into the AccuPlan™ Marker Library
-
Non-AccuMark data:
-
AP_demo_fabric_table1
-
Copy this file in C:\ProgramData\Gerber Technology\Silhouette 2000\Fabrics
-
-
Twill_cotton.jpg:
-
Any desired location
-
-
Twill_cotton-roll.jpg:
-
Security as a Cloud-based application being open on the internet rather than being internally hosted etc. Make sure the file is re-directed to the corresponding location in the Fabric Editor.
-
-
AccuPlan™ Setup
The following steps will guide the user with AccuPlan™ setup and basic workflow.
Open AccuPlan™ from the desktop to cover two areas in this project:
-
AccuPlan™ Settings
-
Product Settings
Order Settings
The user can define the items to use when creating AccuMark Orders. This table replaces the former Template Order in Easy Plan and creates as many tables as needed. The settings are defined per fabric types.
-
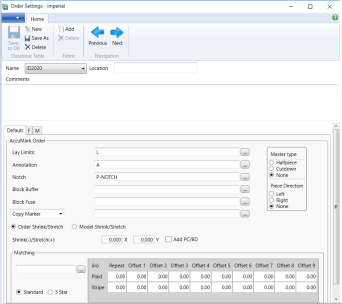
Go to Settings and then click Order Settings—the default table displays. -
Click New to create a NEW table. Name it ID2020 and click OK to continue—the default fabric tab displays.
-
Select Add from the Fabric menu; in the dialog enter M., a new tab is created. Repeat steps for fabric F. Notice that Default fabric cannot be deleted. If F or M fabric tabs are mistakenly removed, then use Add to add it back to the table.
-
Complete settings, as shown in the image. One per each fabric tab: F and M.
-
Click on Save and exit.
Spreading & Cutting Settings
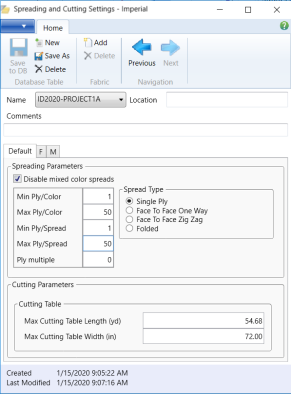
The user can define parameters and constraints for spreading & cutting activities while creating as many tables as needed. Settings are defined per fabric types.
-
Go to Settings then click Spreading/Cutting—the default table displays.
-
Notice that Default fabric cannot be deleted. If F or M fabric tabs are removed by accident, use Add to add it back to the table. Click on Save As.
-
In the dialog box, enter: ID2020-PROJECT1A and press OK.

-
Complete the settings for each fabric type, as shown in the images below.
-
Click on Save to DB and exit.
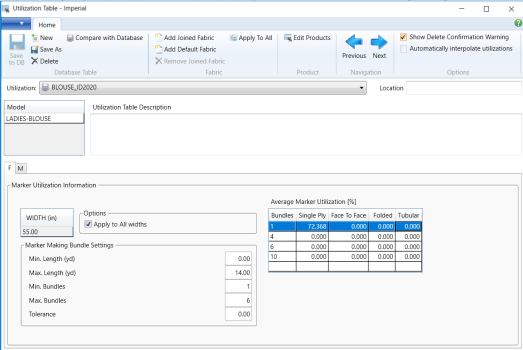
Utilization Table: (Settings) allows users to define marker making constraints. Settings help the Cut Plan engine to constrain the best and most efficient way to generate markers based on the minimum and maximum marker length, min/max number of bundles as well as average marker utilization (%) based number of bundles and spread types. Tables may contain multiple fabric types and are driven by fabric types, product types, or even single models. Product tables are now optional when creating Utilization tables. Refer to what’s a new document for further details.
The Utilization table provides multiple functionalities:
-
Ability to calculate average marker utilization by selecting multiple markers from a selected storage area or using AccuNest to make markers on the fly quickly (Draft mode).
-
Enter multiple fabric widths and share information across multiple ones within the same material type.
-
Group multiple fabrics when treated as a combo.
-
Go to Marker Plan, click on Product then Utilization table.
-
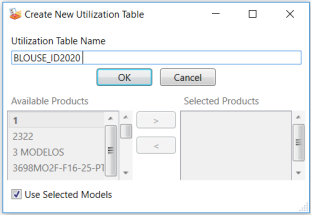
Click on New and a dialog box displays with Use Selected Models box selected by default.
-
Enter a new Utilization Table Name, as shown in the image (BLOUSE_ID2020).
-
Click OK to create a utilization table. The fabric types are created based on the selected
-
Product Table or Model.
-
Complete the following values within the Marker Utilization Information area for each Fabric (F & M) tab:
-
Click the right mouse button on the WIDTH (in) header to add a new fabric width entry. One can also use this context menu to Edit, Add or Delete a fabric entry.

-
For Fabric M, add two different fabric widths: 54.75” and 55”.
-
For Fabric F, add two different fabric widths: 52” and 48”.

-
Let’s calculate the Average Marker Utilization for Fabric M (using existing markers in the Storage Area). There are two ways to calculate it:
-
SELECT: Users can select existing markers in the desired storage area to calculate the average marker utilization (ALL marker criteria must be met!)
-
GENERATE: Users can make markers on the fly using AccuNest. Especially useful when no good markers exist (or don’t exist at all.)
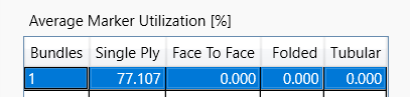
The following steps will guide users through the process by selecting existing markers. Note: Users should ensure the fabric width of 55” is selected and active. Also, enter the following number of bundles: 1, 4, 6 & 10 (press enter each time to add another row.)
-
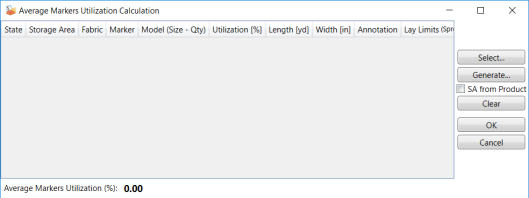
Right-click RMB on the first row (bundle 1), the second column (0.000) under Single Ply, and select Recalculate.

-
In the next dialog, click on Select.
-
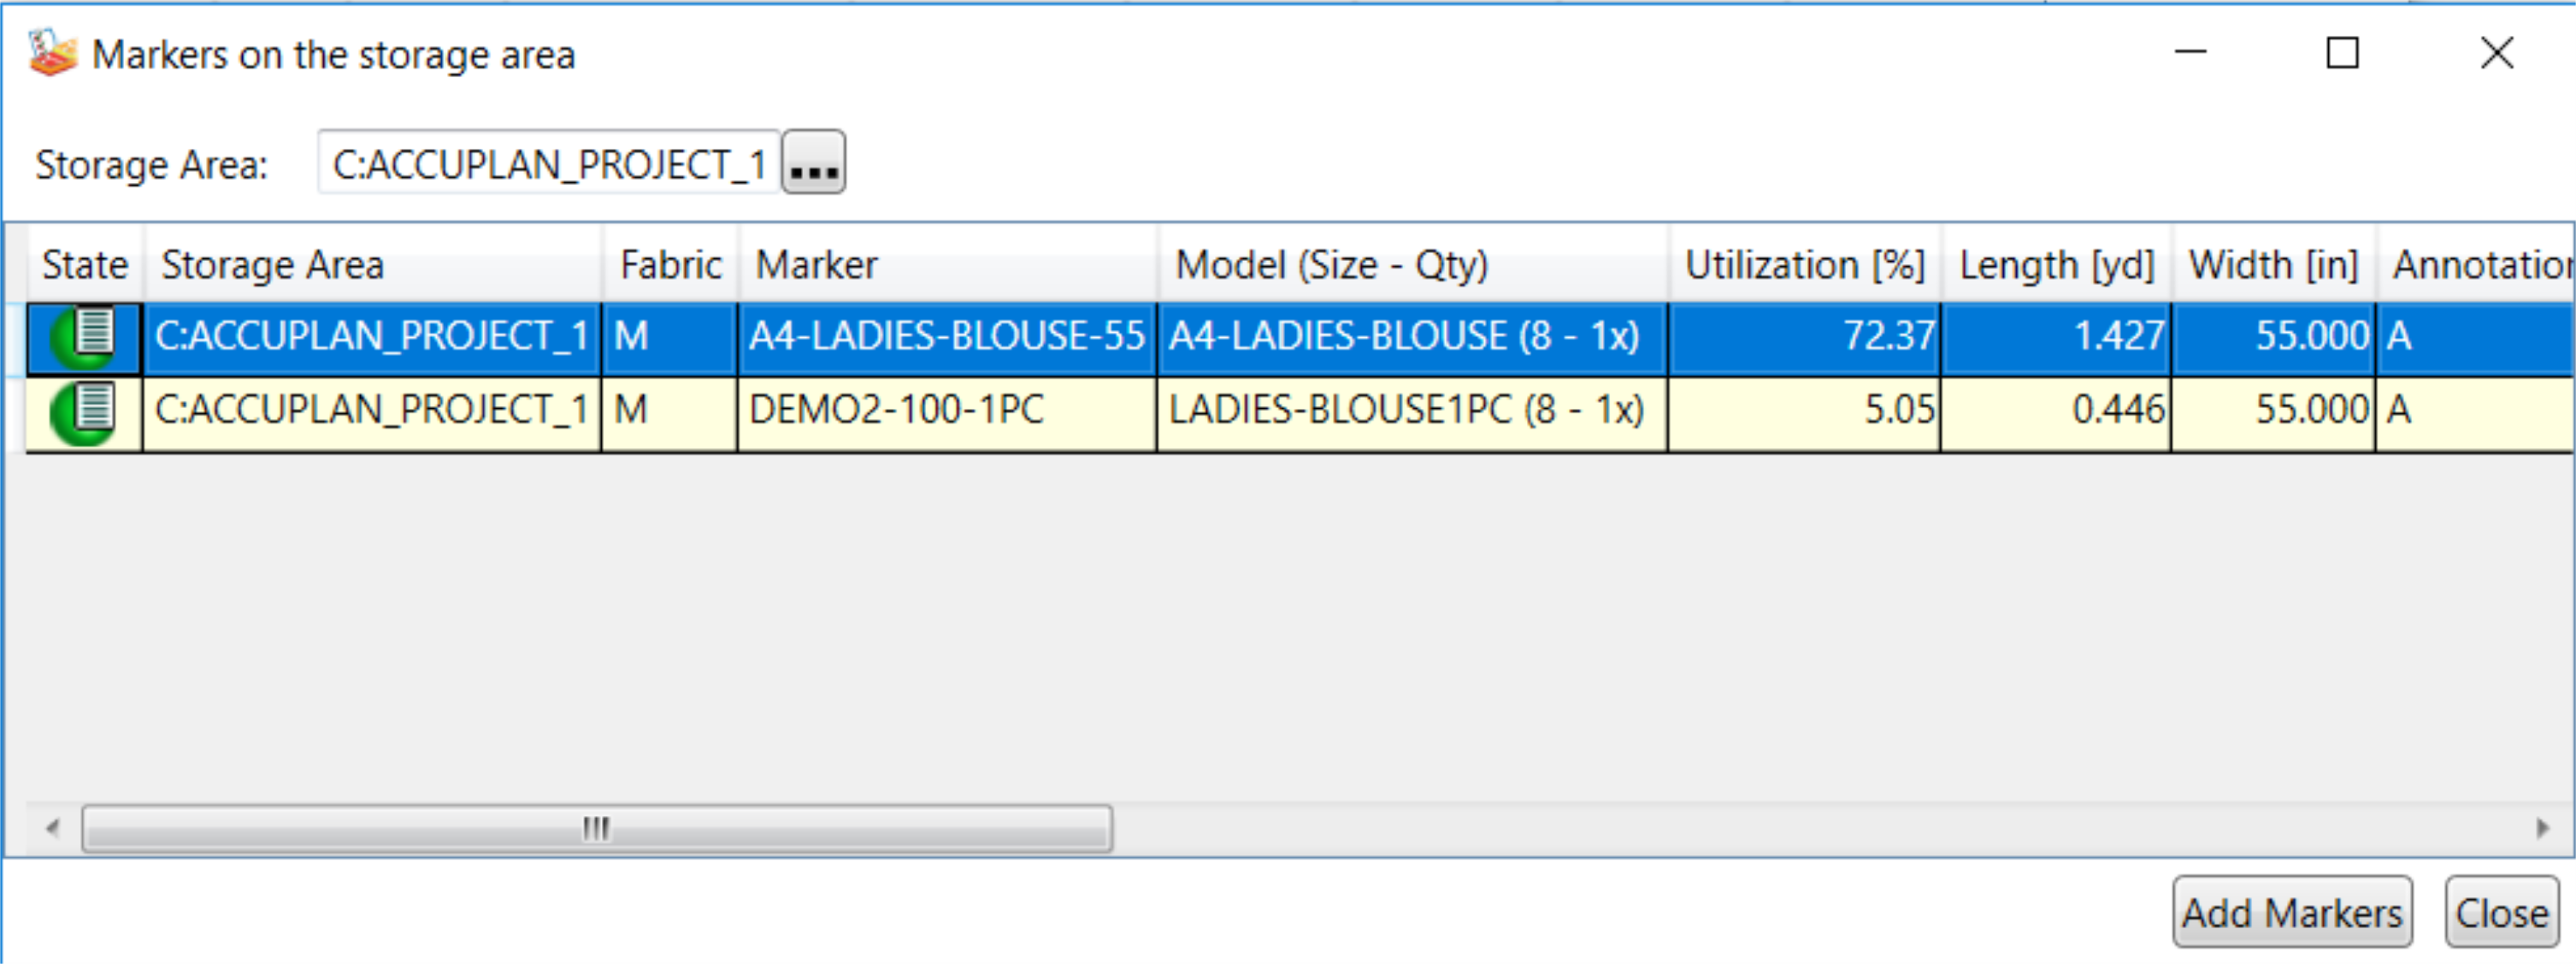
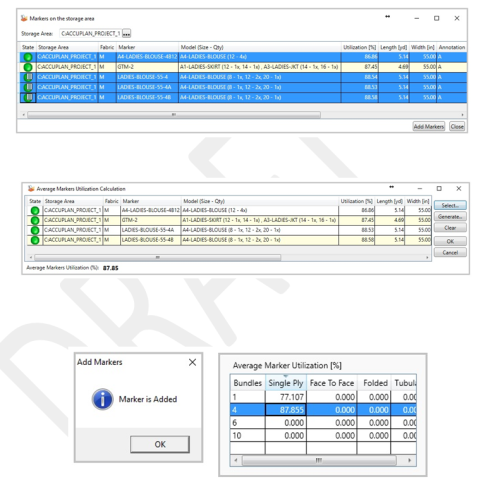
In the next dialog, select storage area ACCUPLAN™_PROJECT_1 at the top. The available markers with one bundle are displayed.
-
Select a row and click the Add Markers button to add the selection to the previous window.
-
A confirmation window opens with the message, Marker is Added. Click on OK to continue; then click on Close to exit out.

-
Information for Bundle 1 marker is completed in the first line of Average Marker Utilization %.
-
Repeat these steps to calculate the Average Marker Utilization values for Bundles 4. There is more than one entry for markers with four bundles. Select all markers by pressing the Shift key. The system will calculate the average marker utilization.
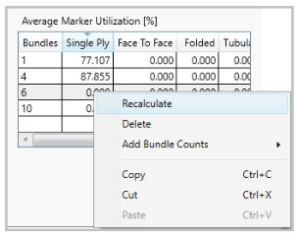
Next, we will calculate average marker utilization for markers with 6 & 10 bundles using AccuNest:
-
Right-click on the row with Bundles 6, under Single Ply, and select Recalculate.
-
In the next dialog, click on Generate.
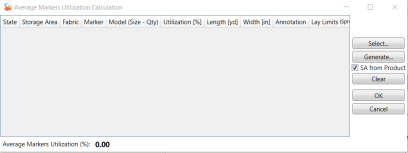
-
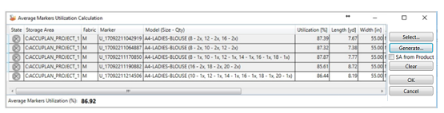
In the next dialog, select the storage area ACCUPLAN™_PROJECT_1.
-
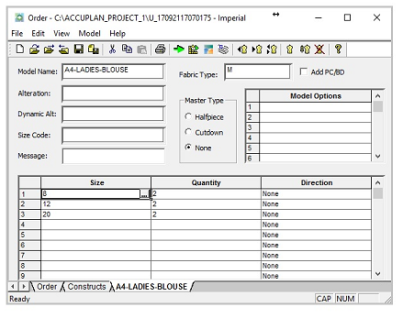
The Classic Order Editor is launched. All information has automatically been filled out. Click on the Model tab (A4-LADIES-BLOUSE). Quantity 6 is set.
-
Click the size lookup button and select the smallest (8), base (12), and largest size (20) to break down the size ratio in two’s.
-
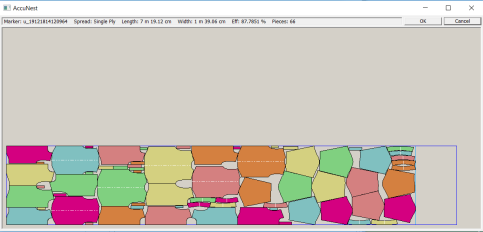
Save order and process. (Note: These orders are not saved in the selected storage area, they are temp files only). Click the ok button on the Success tab, then close the Order.
-
AccuNest is invoked and starts nesting pieces (Draft mode).
-
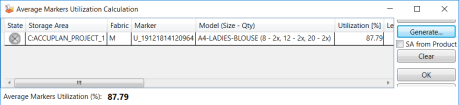
The Average Marker Utilization Calculation window appears. Select the markers with the best utilization and click Ok.
-
The results are shown in the Average Marker Utilization (%)Table.

-
It can also be calculated by submitting 2 or 4 more markers to choose from. Each marker should have a different size ratio to obtain multiple utilization values.
-
Click OK to continue; then click on Close to exit. Information for 6 Bundles marker is completed. In the previous exercises, we could see how to calculate the Average Marker Utilization with 1 marker 2 or 4 more markers.
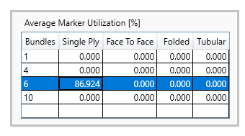
Add Bundle Counts
AccuPlan needs to know what the average marker utilization is for each bundle count; however, this process can be done automatically. Once the user has completed the information for the critical bundle count (this exercise has created so far information for bundles 1,4,6 & 10, now we need to complete the information for the missing bundles in between.
-
Right-click on the table anywhere in the Single Ply column.
-
Select Add Bundle Counts then choose from one of the options below.

-
Copy Values: Allows the user to copy a current value from a known value downwards. In this example, values have been copied from bundle 1 to 2, 3, 5, 7, 8 & 9
-
Interpolate Average Values: AP calculates the average value using the known amounts previously entered. For this exercise, we will use Interpolate Values. NOTE: Please allow a few seconds for the system to calculate the final values.
-
Interpolate Step Values: Add step value for the system to do the calculations automatically based on the value-added
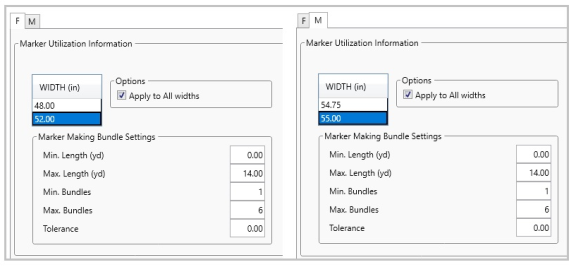
Marker Making Bundle Settings
Maximum marker length is utilized by AccuPlan to control the length of markers in conjunction with the best number of bundles based on efficiencies.
-
Tolerance: it is the allowance to use the same marking settings from the active marker width. In this example, 1.0 means the settings entered for fabric width 55” can also be used for work orders with up to 56” width.
-
Fabric M width 55”, complete the values as shown in the picture below.
-
Fabric F width 52”, complete the values as shown in the picture below.
Options - Apply to All Widths
Checking this box will allow the user to copy values to all fabric widths defined for this fabric type. Make sure to have active Fabric M, Width 55:00, and click Apply to All Widths (see the image below).
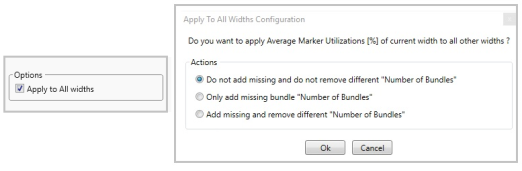
For this exercise, select the option Indicated in the image:
-
Click on OK. Values from fabric width 55” are copied onto W=54.25, and those that were different are removed.
-
Back in the main window, click on Save, then close the window.
AccuPlan™ Workflow
Creating Work Orders and calculating cut plan solutions.
-
In AccuPlan™, click the File arrow
 then New to create a New Work Order.
 -
The Work Order Information window opens. Complete as indicated in the image below.
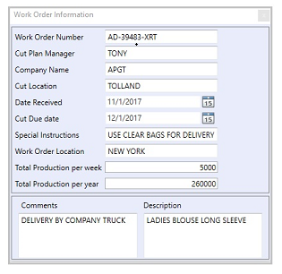
-
Adding Comments is optional; however, the description will be utilized in ALL marker orders (editing in a single way once the order has been created.)
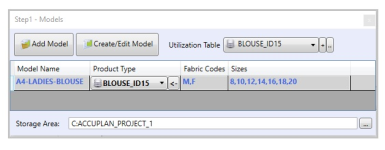
Step 1 - Models
-
Click on Add Model and select A4-LADIES-BLOUSE from storage area AccuPlan™_PROJECT_1.
-
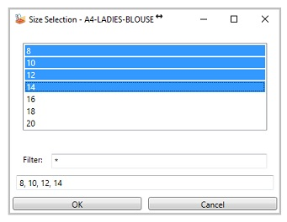
The Size Selection window opens. Use the Ctrl button to select multiple required sizes, as shown in the image. The dialog displays once per each fabric type.
-
Select BLOUSE_ID15 under Product Type.
-
Select BLOUSE_ID15 under Utilization Table (see image below).
Note: Skip Step 1A if the Model does not require Alterations or Size codes.
Step 1A – Model/Advanced
-
Select the Step 1A-Model/Advanced tab.
-
Click the Edit button (…) to select the Alteration LADIES-BLOUSE.
-
Click the Edit button (…) to select the Size Code LADIES BLOUSE.
-
Select the Alteration sizes then click OK.

-
The sizes are added in the Cut Plan Input area. Continue the regular setup process.

Step 2 - Fabrics
Fabric types are automatically populated from the model selected in Step 1. Note: Selecting the Fabric Category is optional and allows the user to pull information from the Fabric Table editor. **Reordering Fabric Sequence: Drag and drop an entire line, so the main fabric (M) is placed on top of the fabric list.

-
Select Twill G from the Fabric Category for Fabric type M and Sherpa for Fabric F (Cost, Weight, and Width are automatically filled in if the values were previously defined in the Fabric Table. If none were previously defined, type the values.)
-
Complete the following for both fabrics:

-
Order Settings: ID15
-
Spread Settings: ID15-PROJECT1A
-
Optional Step: Copy all settings tables for all fabrics, then select tables for the first fabric (M). Click and drag down to copy all settings values to the following fabric.
-
-
Click on the Look Up button (…) next to each table to open up the corresponding table. Notice how each table contains multiple fabrics when opened from the Fabrics grid AccuPlan™ it automatically filters out all fabric tabs but the active one.
-
This also allows users to make changes on the fly when editing Work Orders or use Quick Settings (Advanced Lessons #6).
**How to swap the fabric order: Place the mouse pointer in the Fabric M field and drag it up to the first position (See image below).

Cut Plan Input
How to select different sizes:
-
Place the mouse pointer in the first row where the Size numbers are, then right-click the Edit Size Line tab appears.
-
Select the desired sizes and press OK.
Note: Activate the option Show Used Sizes Only in Work Order Settings

AccuPlan™ automatically creates one fabric tab per each fabric defined in the selected model(s).
-
By default, the checkbox is ON for the 2nd fabric (F).
-
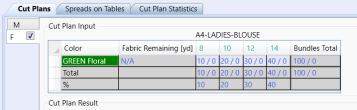
Enter fabric color GREEN Floral then Press Enter.
-
Enter the quantities per size, as indicated in the image.
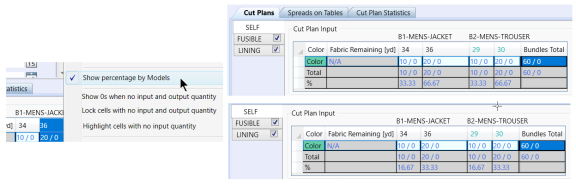
Note: To display the % per each size that indicates the ratio within the whole order, select the option Show Percentage by Models in the Work Order Settings.
-
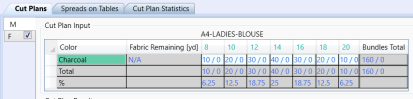
Select first Fabric M and type CHARCOAL for a color name then press enter.
-
Enter quantities per size, as indicated in the image. Notice how AP automatically calculates the % per each size to indicate the ratio within the whole order.
In the Cut Plan Action menu under the Marker Plan tab:
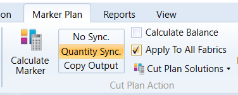
-
Select Apply to All Fabrics to enable.
-
Click on Calculate Marker and wait few seconds.
-
The result for Fabric M and F will be shown at the bottom of the Cut Plan Results window.


Create and Process Orders
After generating the Cut Plan Results, we must create the orders and markers, then process them, either manually with Easy plan or automatically with AccuNest.
Go to Marker Plan/Actions.

-
Click Create orders to create AccuMark orders
-
Click Create Markers to process orders and generate markers
-
Click Process/View Marker to create and process orders, as well as generate markers and launch Easy Marking to open up the first marker shown in the Cut Plan Results.
-
All other options will be covered in Lesson 6.
Size/Quantity Input Grid
Show Output Quantities (Input / Output): This option will display result summary quantity if the checkmark is set. See the graphic below.
Show percentage by Models: Option with a checkmark will show the percentages of each model separately. Option without a checkmark will show the total percentages of the two Models. See the graphic below.