AccuPlan™ Setup
AccuPlan™ provides an integrated cut plan solution to calculate AccuMark markers for a cut order while providing cutting and spreading solutions. In this section, AccuPlan™ Setup will be covered.
By the end of this lesson, the user will be able to:
-
Understand how Settings Tables are created
-
Understand how Product and Utilization tables are created
-
Understand the Fabric Table functionality and setup from within the Model editor
Settings Menu


Settings Tables
Order Settings (Mandatory)
-
Replaces former Template Order
-
Can create as many as needed.
-
Based on fabric types, thus adapts to specific marking & cutting requirements.
-
Add as many fabric types as needed.
-
Automates the process of AM order entry
-
Based on multiple locations
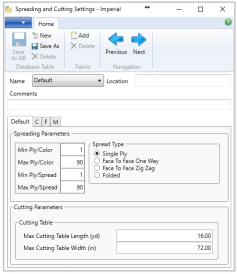
Spreading and Cutting Settings (Mandatory)
-
Defines parameters and constraints for spreading & cutting activities while creating as many tables as needed.
-
Settings are defined per fabric types and locations.
-
Spreading: constraints min/max number of plies per color and spread, as well as spread types
-
Cutting: cutting table dimensions length and width
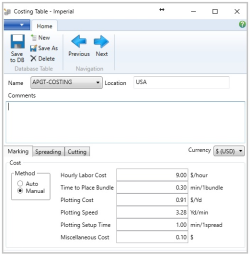
Costing Settings (refer to Lesson 6)
-
Defines the costing and time parameters based on Marking, Spreading, and Cutting activities.
-
Settings may be defined per location.
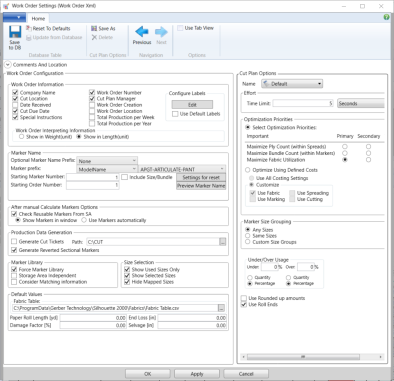
Work Order Settings
It allows the user to define the global environment of the system. All values are applied the same for all CutWork orders. Note: Use Max Bundles per Model has been removed.
-
Go to Settings then click on Work Order. Complete the settings, as shown in the image.

-
Click Save to DB and OK button to apply changes to the Works Order.
-
Save to DB: Press to save to the AP database.
-
Reset to Defaults: Reset to default settings and save to AP Database (Not updating current Work Order)
-
Update from Database: Read values to AP Database (Not updating current Work Order).
-
Use Tab View: Disable or enable the tubular view.
-
Location: This tab is used to write the location.
-
Comments: This tab is used to write comments.
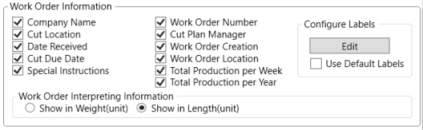
Users can configure the work order within the Work Order Information area.
-
Configure Labels – Edit: Select the Edit button to edit field labels.
-
Work Order Interpreting Information: Toggle between showing cut plan information in Weight or Length.
-
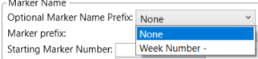
Optional Marker Name Prefix: Select None or Week Number for the Cut Plan Results to show the week number as part of the marker name.
-
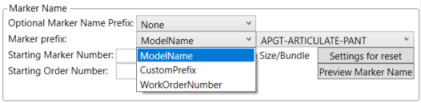
Marker Prefix: Select ModelName, CustomPrefix, or WorkOrderNumber to show for marker name.
-
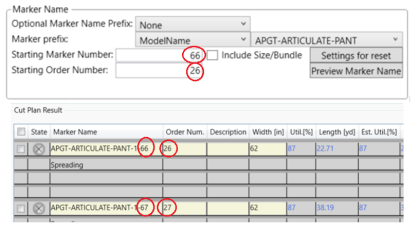
Starting Marker Number: Type a numeric value, up to 4 characters, for the Cut Plan Results to show a particular starting number as part of the marker name.
-
Starting Order Number: Type a numeric value, up to 50 characters, for the Cut Plan Results to show a particular starting number as part of the Order Number.
-
Include Size/Bundle: Add a checkmark to activate the function and show the sizes with bundles in the marker name.
-
Settings for Reset: Use this option to reset Marker suffix to start from scratch when a new AccuPlan session begins. With this option, users now have the ability to control when and how the marker suffix number will either continue numbering from where it ended in previous marker generation or reset from scratch. The index is incremented when closing AccuPlan, opening another Work Order file, or creating a new one. The value will be the latest generated Order/Marker name of the whole work order file.
-
Preview Marker Name: Use the Preview Marker Name in Work Order Settings to verify how the Marker Name will be created.

-
Check Reusable Markers From SA (After manual Calculate Markers): Use to see Reusable Markers from the Storage Area in a manual calculation.
-
Show markers in a window: Usable markers from SA are displayed as Calculated markers found on the storage area window.
-
Use Markers automatically: Usable marker from SA with the best utilization is used in the Cut Plan Result.
-
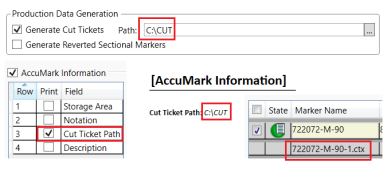
Generate Cut Tickets: If selected, generates cutting tickets and defines the path of the cutting ticket. This information will be reflected within the cut plan report as long as it is selected in the Report Options Cut Ticket Path with a checkmark.
-
Generate Reverted Sectional Markers: This option can be selected by default and depending on how the section marker is built to help sorted sections from highest to lowest number of plies and vice versa.

Marker Library

-
Force Marker Library: For calculation purposes, it means that Marker Library markers should be preferred; however, Marker Library markers may be used even if the option is deselected in w/o settings.
-
Storage Area Independent: It works as a scanner that will search in all S/A until finding the best Markers and those that come closer to the cut plan results. Sometimes the users move the markers to a different S/A or delete them. Then it searches for all the S/A until finding the best Markers for Cut Plan Results.
-
Consider matching information: It works as a scanner that will search for all markers considering matching information inside ML (MARKER Library) until finding the best Markers and those that come closer to the cut plan results. Also, when Cut Plan is calculated, and the Marker Library is used, it will match and display markers that have the same matching information.
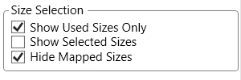
Size Selection
-
Show Used Sizes Only: Select this option to display used sizes only in Cut Plan Input. Unselect to see all the sizes.
-
Show Selected Sizes: This option helps users have better control over whether to display the selected size with zero values or not. If Show Used Sizes Only is selected, then the size columns of value zero "0" will not display after reopening the app file.
-
Hide Mapped Sizes: Select this option to display Jacket sizes only in the Cut Plan Input window for a Pant Drops AP Order. Unselect to show Men's Jacket and Men's Trouser sizes.
Default Values

-
Fabric Table: LBM button editor to navigate and define the route of the Fabric Table.
-
Paper Roll Length [yd]: Ability to define the average Paper Roll Length (Meters or Yards).
-
End Loss [cm/in]: Ability to define default End Loss from Work Order settings.
-
Damage Factor [%]: Ability to define default Damage Factor from Work Order settings.
-
Selvage (cm.in): Ability to define default Selvage from Work Order settings.
Cut Plan Options
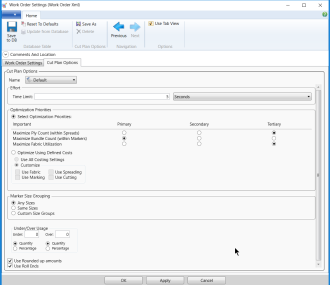
Users can create and save as using different names. Often work orders are planned differently; thus, those options apply specifically to individual cut Work Orders. This allows users to track down what cut plan options were utilized in a given work order file. When a cutwork order is saved and later opened, its own cut plan options are loaded with it so users can continue planning accordingly.
-
Save As: Save as a new Cut Plan Option.
-
Previous & Next (Navigation arrows): Navigate from one Cut Plan Option to another.
-
Use Tab View: Disable or enable the tubular view.
-
Comments And Location: This tab is used to write Comments and Location.
-
Name: It shows the cut plan options that are configured in the work order and the different cut plan options that have been created previously.
-
Effort – Time Limit: The estimated time limit that it will take the AP to calculate markers.

-
Optimization Priorities: There are three types of strategies to prioritize markers calculations that can be prioritized by Maximize Ply Count (within Spread), Maximize Bundle Count (within Markers), or Maximize Fabric Utilization.
-
Optimization Using Defined Costs: There are four types of Optimize Using Define Cost by Use Fabric, Use Marking, Use Spreading, and Use Cutting. Optimize cut plan results are based on cost settings. When selected, the AccuPlan calculation engine will minimize the total cost determined by the specified costing settings to optimize cut plan solutions. Note that the engine can work with one option at a time: Optimization by priorities or by Costing settings.

Marker Size Grouping

-
Any Size: Sizes are combined in a random way to obtain the best utilization.
-
Same Size: Bundle combination in a marker will always contain the same size.
-
Custom Size Groups: When selected, a new line displays at the top of the Cut Plan Input grid labeled Size Group.
-
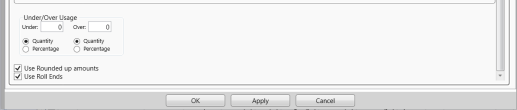
Under/Over Usage: This is used to increase or decrease the total number of products to be produced.
Typing a value in the Under Usage fields, will calculate the total of products below the total ordered. Entering an Over Usage value calculates the total of products above the total ordered. The values can be defined in percentage or linear.
-
Use Rounded up amounts: To making a number easier but keeping its value close to what it was when to apply under/over-usage. The result is less accurate but easier to use.
-
Use Roll Ends: This option enables the ability to calculate single size markers based on the number of roll ends the company (Fabric Warehouse) has available. Note: This feature does not provide the length of fabric in each roll end.
-
OK: Applies changes to AccuPlan Work Order and closes the dialog box without saving changes to the database.
-
Apply: Applies changes to AccuPlan Work Order and leave the dialog box opened, without saving changes to the database.
-
Cancel: Closes the dialog box without saving changes to the database.
Product Definition
It allows the user to define how a given product should be treated in the cutting room. Settings in these tables will drive the cut plan calculation more accurately and effectively.

Product Table
It allows the user to define a generic product with dimensional constraints (areas and perimeters.)
If defining a garment product, each dimension (size) is AUTOMATICALLY calculated by the system.

How to create Pant Drops:
Let’s begin by automating the process of picking the pant size that is associated with the Coat or Jacket size for each model with pants. Next, the example below provides further detail of Pant Drops.

-
First range (Green) difference is 6 – Pant Drop 6
-
First range (Blue) difference is 5 – Pant Drop 5
-
First range (Orange) difference is 4– Pant Drop 4
The first thing to do is create a Product table to define the Pant drops in a couple of steps:
-
Select the Product Table.
-
Click New and type the desired name.
-
Place a checkmark on Map All sizes.
-
Select the desired Models for Pants and Jacket or Coat.
-
If the size code is configured in the Model, it will immediately appear. If not, select the desired one for both products.
-
Click Ok. The product table for the Pant Drops order is ready. To change the value of the pant drops, use the configuration tools.
-
Once the size is changed, press Save to DB.
-
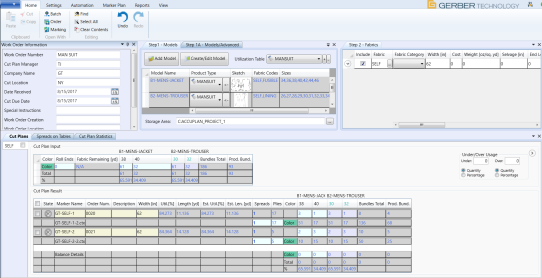
After completing the Product & Utilization tables, add them to the Work Order with the quantities by size and fabric widths.
-
Click Calculate Marker. The new AP work order will look like the image below.
-
The picture shows the total products for a Man Suit order (Prod.Bund).

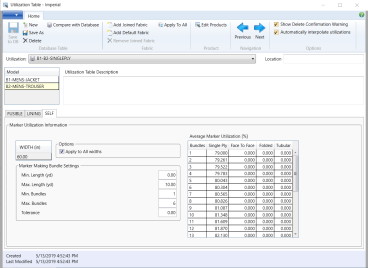
Utilization Table
-
Defines marking constraints to generate the best and most efficient markers
-
Min/Maximum marker yards length
-
Min/Max number of bundles
-
Tolerance
-
Tables can contain multiple fabric types and are driven by Product tables and Locations.
-
Multiple functionalities:
-
Combine multiple products (Suits for Men)
-
Automatically calculates average marker utilization from existing multiple markers or using AccuNest (Draft mode)
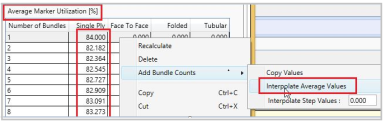
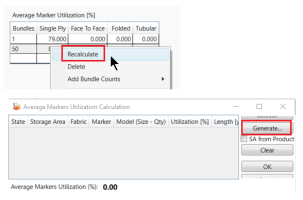
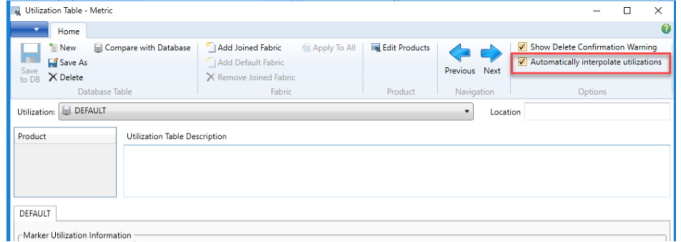
The automation of the Utilization Table has made marking efficiency easier. A new option, Automatically Interpolate Utilizations, is listed within the Options menu. It automatically calculates bundle count and average marker utilization, to simplify the creation of:
-
DEFAULT utilization is created (if not existed before) and selected when starting AccuPlan.
-
Added button Add Default Fabric to Utilization view header, which is active when there is no DEFAULT fabric present.
-
Option
-
Select DEFAULT within the Utilization drop-down. Then enter any width in Step 2 and enter the min-max value in Quick Settings to calculate marker.
-
Create a new Utilization Table, if fabric = DEFAULT is added and the width of other fabrics are defined.
-
Calculating marker with the current fabric width: just use those utilizations.
-
Calculating marker with any width: just use DEFAULT's utilizations.
-
Create a new Utilization Table. The Automatically interpolate utilizations to utilization header is unchecked by default.
-
Each UT has its own checkbox selection.