Submitting Markers to AccuNest Professional Edition
There are two ways to submit markers to AccuNest Professional Edition. Users may submit markers using the UltraQueue program or send them directly to AccuNest Professional Edition with AccuMark Explorer if the AccuMark system has queue submit or the nesting server installed.
Using UltraQueue allows multiple AccuMark systems to submit markers to the same nesting server. A network drive must be mapped on the AccuMark system to allow the AccuMark to see and submit to the nesting queue. A drive may be mapped within the UltraQueue application from the Configure menu.
Submitting markers with UltraQueue:
Click the UltraQueue icon located on the desktop or select Queue Submit from the Start Menu. (Start>All Programs>Gerber Technology>UltraQueue>Queue Submit.

A Queue may be selected from the File Menu. If the jobs are being submitted to a nesting server, a drive must be mapped to the nesting server to allow the queue file to be displayed from the File> Open Queue File selection. A drive may be mapped from Configure> Map Network Drive.
Note: Both client and server stations must have marker storage areas mapped to the same drive letter. For example, if a submitting pc has drive J mapped for storage areas, the server must also have this location mapped as J.
The default location for the queue file in a new installation is
C:\Users\Public\Gerber Technology
By Windows default, these are hidden folders. A system administrator may choose to show them. From Windows Explorer, select Tools>Folder Options. Click the View Tab and select “Show hidden files and folders.”
When the Queue opens, select Nest from the Jobs menu to open the Nest Markers dialog.

Double clicking an entry in the Queue’s engine line will launch a log and Quick View of the marker. Double clicking the entry on the Save line will launch the marker in AccuMark Marker making
When jobs appear in the Queue, they are listed in colors that indicate the state of the job. If a job turns red upon completion, it has failed. This may be caused by a variety of reasons, including sending a marker that contains information not supported by AccuNest Expert, such as markers with split pieces. Double clicking the job will launch a log file that will include error information.
Blue indicates the job is awaiting processing, grey indicates a completed job entry for the nesting engine, while black shows the entry made as the completed marker is committed back to an AccuMark storage area. Green indicates the job is actively processing.
If an entry displays in orange there is warning for the user. Open the log for the marker by clicking the marker name. Clicking on the Engine’s marker entry will open the marker in a view window and display the entry’s log file.
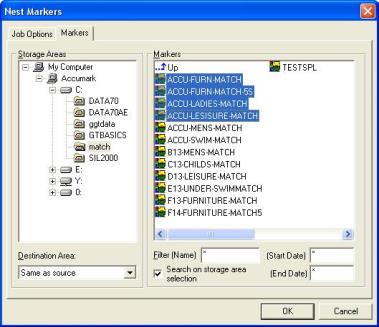
Clicking on the marker on the commit entry will launch the marker in AccuMark marker making. Once Nest is selected from the Jobs menu, the Nest Markers dialog appears with the Job Options tab active.
Select the Job Options. Click the Markers tab to select markers for nesting/packing. Click OK and the markers are sent to the Queue for processing.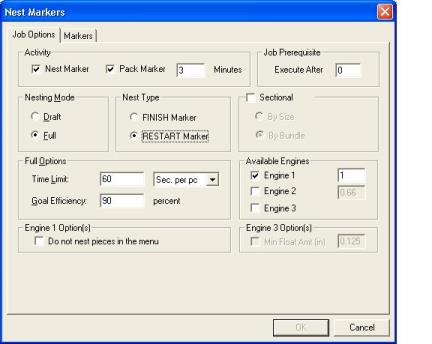
-
The Activity portion of the dialog allows the user to specify if the markers are to be nested, packed or both. Select Nest Marker to place pieces in the marker. Select Pack Marker and the time limit to pack if you would like to pack the marker after AccuNest Professional Edition makes it.
Note: AccuNest Professional Edition will not pack a Tubular/Bookfold or Sectional Marker.
-
Job Prerequisite: You may specify that a particular job have a pre-existing job as its prerequisite. This new job will wait until its prerequisite is completed. Type the number of the job that must be completed prior to the new job.
-
Select Draft mode to have AccuNest Professional Edition make one attempt to make the marker or select Full mode to have AccuNest Professional Edition nest according to a specified Time Limit.
-
If Full mode is selected, set a Time Limit. The choices are to allow seconds per piece, minutes per piece, hours for the marker or minutes for the marker.
-
Select FINISH marker to have AccuNest Professional Edition keep the placed pieces in the marker or select RESTART marker to allow the software to un-place all pieces in the marker before beginning to nest.
-
Select Sectional to make a sectional marker by bundle or size.
-
AccuNest Professional Edition features one nesting engine. The time allowance for each engine divides the time allotted for the marker to be divided between multiple engines, if additional engines are purchased.
-
Engine 1 Options allows the user to select not to place pieces remaining in the menu if RESTART marker is selected. Only pieces that are in the marking area will be placed.
Note: The time selected is a guideline for AccuNest Professional Edition
After the job options have been selected, click on the Markers tab to display the Storage Areas and selected markers. Click OK to begin nesting/packing the selected markers. Once the processing starts, a status dialog box will be displayed.